Elaborate and lucious, hot blooded colors not expected on a ceanothus!
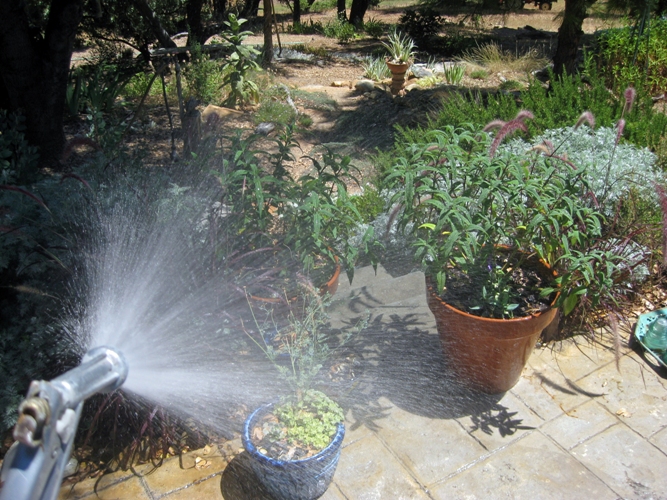
I like to hand water. It’s relaxing, …cool on a hot day, I can watch over the newly-establishing plants and weed a bit in the wet, soft soil. I like a hose sprayer that doesn’t leak and a place to sit where I can water a lot of things and daydream while I do.
I like to hand water,…up to a point. By August, I’m over it. Besides, our family usually goes on a trip or two during the hot summer, times that I know my patio pots won’t live through.
Lots of California can be called Mediterranean and the plants suited to this climate, cool rainy winters and hot dry summers, don’t need much summer water once established. To me, the ‘technical’ term, once established, means the plant has not only stayed green, but started to grow. The trick is finding out how much water it needs from year to year after that.
Over the last few years, gardening in the foothills of Central California, I’ve learned a few things about watering Mediterranean and California native plants here. Sadly, many lessons were learned at the expense of the plants and I’ve killed many before I knew anything much about anything.
I’ve learned that rosemary, thyme, iris and lavender can live on only monthly water from the start, even before you have access to water on your property. These are the ones I planted before we lived here full time. We’d come up from So Cal once a month and I’d water these, planted from 4” pots along the new retaining wall. They are still doing well now, after 8 years.
I learned from a neighbor how to put a drip system together. Just two types of emitters, 1 gal per hour drippers and sprayers attached by thin tubing to drip hoses around the edges of planting areas, spraying in.
Drippers are for larger, spaced out shrubs and sprayers for low growing perennials and low growers. I also use flow regulators at the faucets.
Best tip, carry all your supplies with you when you work on your system. This one is a picnic basket with neat dividers
The best tips she gave me was to take ALL your supplies with you when construct, change or repair the lines. And don’t cut the thin tubing until you get over to the plant to be watered.
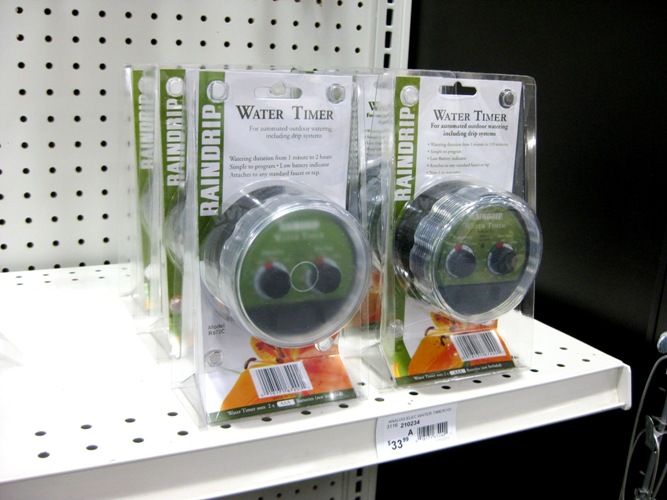
Drip timers This kind is set for the time you want them on, for me 6am for an hour with most drippers one gallon per hour
I learned how long and how often to set my drip system. I have found that every three days for an hour gives new plants a gallon of water. During vacations, I set one line to every day and arrange my patio pots near the sprayers. After a year or two, I can plug many emitter holes because plants like ceanothus, buckwheat and other natives only need one or two waterings during the hottest part of the summer. Yea!
I learned to count how many seconds it takes to hand water a gallons worth of water on a plant. For me, two counts of eight. Just fill up a gallon container and count. Good to know!
I learned to check the depth to which water gets to the roots after watering. With a lot of plants you want the water to reach below where the roots stop so they will grow deeper. Short, surface waterings can keep roots near the soil surface so I water so each plant deeply while it’s establishing.
I learned to keep plants in zones according to how much water they need. The closer to the house the more water plants get, especially since the patio is hosed off now and then. Roses, Iris, patio pots and Japanese Maples are here. The drip system is in the middle zone watering the Salvia bed, the rain garden and the perennial beds and in the hinter lands, there are natives only that will never get drip.
I learned to mulch around plants 2-3 inches with native wood chips and pine needles. With the first Fall rains, I will sometimes turn this into the soil to enrich it. It’s working because lots of the planting beds are getting nice loose crumbly soil which makes the soil much easier to water.
Most important for me, since I lived on a 15 degree slope:
When planting on a slope, place a rock on the downhill side to anchor it and keep water longer near the roots
I learned to plant on a slope, build a level watering berm around it, with a basin above the plant and a rock below. The basin is large enough to hold a half gallon to a gallon of water at a time and the rock holds moisture longer near the roots, as well as anchoring the plant into the slope.
Fortunately, we have a strong running well dug in 2004 and have plenty of water to keep the garden going. The well digger, Steve, water dowsed the area before he dug. It is 300 feet deep, but the water was found at 100 ft with water pressure at 16 gal per minute.
We placed a dark green polyethylene 2500 gallon water tank 100 feet above our house so it would gravity feed during our frequent power outages; however we do have a pump, so the water storage is mainly for fire personnel to use. We had a fire hose attachment installed on the side.
“Case histories and demonstrations of dowsers may seem convincing, but when dowsing is exposed to scientific examination, it presents a very different picture. The natural explanation of “successful” water dowsing is that in many areas underground water is so prevalent close to the land surface that it would be hard to drill a well and not find water. In a region of adequate rainfall and favorable geology, it is difficult not to drill and find water!”
...and still have a pretty garden With a busy household and jobs, we are…
Take a day trip to Whiskey Falls... Come visit Whiskey Falls and the surrounding high…
Why do oaks drop more acorns some years and not others? If you have live…
Roadside treasures worth stopping for In the first week of July in the Sierra foothills…
Wow! Butterflies love these plants! Grow any of these for instant results and each is…
Your water-wise veggie garden Does everyone in our Mountain Community grow at least one tomato?…